


67-24
User Guide for Cisco Security Manager 4.4
OL-28826-01
Chapter 67 Managing Reports
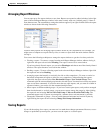
Working with Reports in Report Manager
• (PDF only.) The graphical representation of the report data.
• The tabular report data. In PDFs, the information is represented as a table. In CSVs, the information
is comma-separated, with the first row being the column headings.
To export the report, click the down arrow in the Export button above the report and select either As
PDF or As CSV. You are prompted to select a folder for the report. A default file name is provided, but
you can change the file name.
Configuring Default Settings for Reports
You can control the default settings that Report Manager uses for System reports. When you change the
defaults, you automatically change the settings for all System reports, but the changes do not apply to
any reports you saved as custom reports (in the My Reports folder). You must have system administrator
or network administrator privileges to change these settings.
While viewing a report, you can edit any system report to specify different values for these settings,
either to use temporarily while viewing the report, or to save as a custom report in the My Reports folder.
Tip If you change the settings in a system report, you can return the report to the default settings by clicking
the Reset button in the Report Settings toolbar.
Step 1 In Report Manager, select Tools > Default Report Settings to open the Default Report Settings dialog
box.
Step 2 Configure any of the following options:
• Top—The number of results listed in any of the “Top” reports, which list the most-often occurring
items of the type targeted by the report. For example, if you select 20, the firewall Top Destinations
report shows the 20 most often occurring traffic destinations in events reported to Security Manager.
The default is 10.
If you select more than 10, all items after the tenth are summarized as “others” in charts, although
the detailed information for each additional item is listed in the report table.
• Time Range—The time window for events included in the report:
–
Last 1 Hour—The last full one hour on the zeros, for example, if the current time is 11:45 AM,
the Last 1 Hour report shows data from 10:00 to 11:00.
–
Last 1 Day—The last full day, from midnight to midnight. For example, if the current day is
Tuesday, the Last 1 Day report shows data from Monday.
–
Last 1 Week—The previous Monday through Sunday.
–
Last 1 Month—The previous month. For example, if the current date is September 29, the Last
1 Month report shows data from August.
For more information on the implications of the time range setting, see Understanding Report
Manager Data Aggregation, page 67-4.
• Default Email Address—The email address used as the default destination for scheduled reports.
If you decide you want to return to the installation default values, click Restore Defaults.
Step 3 Click Apply to save your changes, then click Close to close the dialog box.