


17-7
User Guide for Cisco Security Manager 4.4
OL-28826-01
Chapter 17 Managing Firewall Inspection Rules
Inspection Rules Page
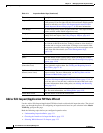
• Source and Destination Address and Port (PIX 7.x+, ASA, FWSM 3.x+)—Select this option for
the same reason you would select Destination Address and Port for IOS devices, although you have
the additional option of identifying the source of the traffic. When you click Next, you are prompted
for the source and destination addresses and the service port information.
Note For FWSM 2.x and PIX 6.3(x), you can select either Default Inspection Traffic or Custom
Destination Ports only.
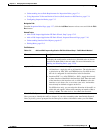
Step 5 Click Next. If you selected anything other than Default Protocol Ports, fill in the required addressing and
port information explained above and click Next. See Add or Edit Inspect/Application FW Rule Wizard,
Step 2, page 17-12.
Step 6 On the Add or Edit Inspect/Application FW Rule Wizard, Inspected Protocol Page, page 17-16, select
the protocol you want to inspect from the list. Ensure that the Device Type field indicates that inspection
is supported for that protocol on the devices to which you are assigning the rule. (If you assign a rule to
an unsupported device type, the rule is ignored but you will get a validation warning).
If the protocol you select allows additional configuration, the Configure button becomes active. Click
it to view and select your options. For more information, see Configuring Protocols and Maps for
Inspection, page 17-21.
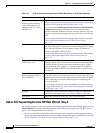
For IOS devices only:
• If you selected Custom Destination Ports or Destination Address and Port as the traffic match,
you can select custom protocol as the protocol name and click Configure to assign a name to the
configuration.
• You can configure additional alert, audit, and timeout settings that override those set in the
inspection settings policy. You can also specify whether to inspect router generated traffic for a
limited number of protocols. For more information about inspection settings, see Configuring
Settings for Inspection Rules for IOS Devices, page 17-88.
Step 7 Click Finish to save the rule.
Step 8 If you did not select the right row before adding the rule, select the new rule and use the up and down
arrow buttons to position the rule appropriately. For more information, see Moving Rules and the
Importance of Rule Order, page 12-19.
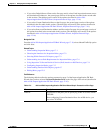
Inspection Rules Page
Use the Inspection Rules page to configure inspection rules for device interfaces. Inspection examines
traffic that travels through the device to discover and manage state information for TCP and UDP
sessions. The device uses this state information to create temporary openings to allow return traffic and
additional data connections for permissible sessions.
Note With the release of Security Manager 4.4 and versions 9.0 and higher of the ASA, the separate policies
for configuring IPv4 and IPv6 inspection rules were unified. In Policy view, IPv4 and unified versions
of the policy inspection type are provided. In addition, a utility that you can use to convert IPv4 policies
is provided (see Converting IPv4 Rules to Unified Rules, page 12-28). The following descriptions apply
to apply to all versions of the inspection rule table, except where noted.