


66-38
User Guide for Cisco Security Manager 4.4
OL-28826-01
Chapter 66 Viewing Events
Using Event Viewer
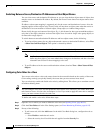
Editing a Custom View Name or Description
To change the name of a custom view, or the custom view’s description, do one of the following:
• Select the custom view in the view list and click the Edit button above the list.
• Right-click the custom view in the view list and select Edit.
Then, make the desired changes to the custom view name or description and click OK.
Note View names can be up to 128 characters and contain alphanumeric characters, spaces, hyphens (-),
underscore characters (_), plus signs (+), periods, and ampersands (&). The description can be up to
1024 characters.
You cannot change the name or description of a predefined view.
Switching Between Real-Time and Historical Views
You can update the events table for any view using either real-time or historical time periods. A real-time
view shows events as they are received, whereas an historical view shows a static list of events that is
not updated until you click the Start button in the event table toolbar.
To switch between real-time and historical time periods in an open view, do the following:
• To see events in real-time, select View > Mode > Real Time, or click the Time Selector control in
the event table toolbar and select Real Time. For help in locating the control on the toolbar, see
Event Table Toolbar, page 66-14.
• To see events in an historical period, select the desired time frame from the View > Mode menu or
from the Time Selector control on the event table toolbar. All options other than Real Time are
historical views. For more information, see Selecting the Time Range for Events, page 66-39.
Saving Views
If you edit the settings for a view, you must save it to make those changes permanent. Saving a view
saves changes to filters (for custom views only), table preferences such as selected columns, column
width, and sort order, the time range, and color rules. If you make filter changes to a predefined view,
you must use Save As to create a new custom view.
• To save changes to a view, do one of the following in Event Viewer:
–
Select File > Save from the menu bar.
–
Click the Save button in the event table toolbar.
You are asked to confirm that you want to save your changes.
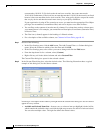
• To save your changes as a new custom view, do one of the following to open the Save View As dialog
box:
–
Select File > Save As from the menu bar.
–
Click the down arrow on the Save button in the event table toolbar and select Save As.
–
Right-click the view in the views list and select Save As.
Then, enter a name for the view and optionally a description of the view and click OK. The view is
added to the My Views folder in the views list.