


66-35
User Guide for Cisco Security Manager 4.4
OL-28826-01
Chapter 66 Viewing Events
Using Event Viewer
If you have already floated a view, you can select Floating to and choose one of the already-floated
windows. The view becomes a new tab in that window.
• Docking a view—To move a floating view back to the main Event Viewer window, right-click the
view tab and select Docking.
• Arranging views horizontally or vertically for side-to-side comparison—To create a vertical or
horizontal arrangement of views to allow for easy comparison, without floating the views,
right-click the view tab and select New Horizontal Group or New Vertical Group. These
commands split the current tabbed group into the selected layout. You must have at least two views
open to use these commands. If you have more than two open views, and you want all of them in
separate windows, you need to use the command multiple times.
• Move views to different tabbed groups—If you have several open views, and you have arranged
them into horizontal or vertical groups, you can move views among the groups by right-clicking the
view tab and selecting Move to Next Tab Group or Move to Previous Tab Group. The commands
appear only if views are arranged in a manner where such movement is possible:
• Change the orientation of groups—You can switch between horizontal and vertical layouts by
right-clicking the view tab and selecting Change Tab Groups Orientation.
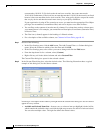
Customizing the Event Table Appearance
You can customize the appearance of predefined or custom views in the event table to meet your
requirements. You can save these changes even in the predefined views.
You can do the following to customize the event table:
• Create column filters to limit the type of events listed. Use the down arrows in the column heading
to define the filter as described in Creating Column-Based Filters, page 66-41.
• Create color rules to highlight events based on severity, as described in Configuring Color Rules for
a View, page 66-36.
• Change which columns appear in the table by clicking the Column Selector icon to the right of the
table heading row, as described in Columns in Event Table, page 66-16.
• Change the width of a column by clicking the right edge of the column heading and dragging it to
the desired size.
• Change the order of the columns by clicking the column heading and dragging the column to the
position you want.
• Sort the events list by a column by clicking the column heading. The column sorts based on a
three-click cycle: ascending, descending, and default order (which is by event reception time).
• Reset the width of the View Selector and Event Monitoring window to their default values by
selecting View > Reset Layout.
• Change whether the source and destination columns show IP addresses or host object names, as
described in Switching Between Source/Destination IP Addresses and Host Object Names,
page 66-36.
Related Topics:
• Creating Custom Views, page 66-37
• Saving Views, page 66-38