


67-11
User Guide for Cisco Security Manager 4.4
OL-28826-01
Chapter 67 Managing Reports
Overview of Report Manager
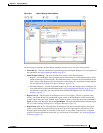
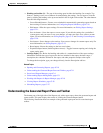
• Heading and toolbar (2)—The top of the settings pane includes the heading (for example, Top
Sources - Settings) and a row of buttons for manipulating the settings. You can open or close the
pane by clicking the heading or the up arrow button in the far right of the toolbar. The other buttons
have the following functions:
–
Create Schedule button—Creates a new schedule for automatically generating reports based on
these settings. For more information, see Configuring Report Schedules, page 67-28.
–
Edit button—Edits the report settings. For more information, see Editing Report Settings,
page 67-21.
–
Save As button—Saves the report as a new report. If you edit the settings for a predefined
system report, and you want to save your changes, you must use Save As to create a custom
report. For more information, see Saving Reports, page 67-25 and Creating Custom Reports,
page 67-20.
–
Save button—Saves changes to the settings. You can save changes for custom reports only. For
more information, see Saving Reports, page 67-25.
–
Reset button—Resets the settings to the last saved values.
–
Expand/Collapse button (double up/down arrows)—Toggles between opening and closing the
report setting pane.
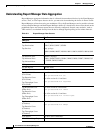
• Settings display (1)—Below the heading and toolbar is a summarization of the report settings.
Information includes the type of report, the devices included in the report, the time range, a
description, the schedules defined for the report, and other properties unique to the report.
To change the description, type your changes directly into the Description edit box.
Related Topics
• Opening and Generating Reports, page 67-18
• Understanding the Generated Report Pane and Toolbar, page 67-11
• Overview of Report Manager, page 67-6
• Understanding Report Management, page 67-1
• Working with Reports in Report Manager, page 67-18
• Viewing Report Schedules, page 67-28
• Scheduling Reports, page 67-27
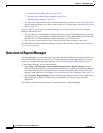
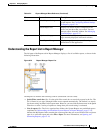
Understanding the Generated Report Pane and Toolbar
The bottom part of the right side of the Reports tab, with a report open, shows the generated report and
report toolbar. This pane displays the results of clicking the Generate Report button.
The following illustration shows an example of the generated report pane and its associated report
toolbar.