


67-28
User Guide for Cisco Security Manager 4.4
OL-28826-01
Chapter 67 Managing Reports
Scheduling Reports
This section contains the following topics:
• Viewing Report Schedules, page 67-28
• Configuring Report Schedules, page 67-28
• Viewing Scheduled Report Results, page 67-30
• Enabling and Disabling Report Schedules, page 67-30
• Deleting Report Schedules, page 67-31
Viewing Report Schedules
You can view a list of report schedules that are configured in Report Manager. If you have system
administrator or network administrator privileges, the list includes all schedules configured on the
server, whether you configured them or another user configured them. Users with lesser privileges can
see their own schedules only.
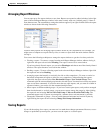
To view the list of report schedules, select the Scheduled Reports tab, and if necessary, the Schedule
List sub-tab. The list shows the schedule name, description, the report that will be generated by the
schedule, the frequency of report generation, the e-mail addresses to which reports are sent (if any),
whether the schedule is enabled or disabled, and the username of the person who created the schedule.
You can use the following controls to manage report schedules from this page:
• Pagination controls—If there are a lot of schedules, use the pagination controls (below the table to
the left) to move through the list. You can click the buttons to move to the first page, previous page,
next page, or last page, or type the page number into the Page X of Y edit box. You can also click
the down arrow in the edit box to change the edit box to work by record number rather than page
number.
• Add button—Click this button to add a new schedule. For more information, see Configuring
Report Schedules, page 67-28.
• Edit button—Click this button to edit the selected schedule. For more information, see Configuring
Report Schedules, page 67-28.
• Delete button—Click this button to delete the selected schedule. For more information, see
Deleting Report Schedules, page 67-31.
• Refresh button—Click this button to update the list with the latest information.
• Enable button—Click this button to enable the selected schedule. The button is active only if the
selected schedule is disabled. For more information, see Enabling and Disabling Report Schedules,
page 67-30.
• Disable button—Click this button to disable the selected schedule. The button is active only if the
selected schedule is disabled. For more information, see Enabling and Disabling Report Schedules,
page 67-30.
Configuring Report Schedules
You can create schedules to automatically generate reports at set times. The generated reports are
e-mailed to identified recipients and are also stored and available for viewing from Report Manager. By
scheduling reports, you can easily and efficiently create regular milestone views of network security and
usage. This procedure explains how to set up a schedule for a report.